Saturday, January 31, 2009

WEEKEND CAT BLOGGING #191

This week, Sir Tristan and Tabby Cat Longtail at "Tabbylicious" (USA) are happy to announce that they are hosting Weekend Cat Blogging #191...

To submit your kitty picture(s), you can either leave a message in their blog's comment section (with your permalinks) or contact them via e-mail without forgetting to give all the needed information.

"As anyone who has ever been around a cat for any length of time well knows cats have enormous patience with the limitations of the human kind."
~ Cleveland Amory ~

Thursday, January 29, 2009

TUILES - THE DARING BAKERS


This month's challenge is brought to us by Karen of "Bake My Day" and Zorra of "1x Umruehren Bitte" aka Kochtopf. They have chosen "Tuiles" from "The Chocolate Book" by Angélique schmeink and "Nougatine and Chocolate Tuiles" from Michel Roux.

It is the very first Daring Bakers challenge of the year and, thankfully, after the Christmas/New Year period during which most of us embarked ourselves into a baking/cooking/eating frenzy, this light recipe is very welcome as it is far from being gargantuesque and doesn't require hours of slaving in the kitchen. The pefect choice for a stressless and healthier start!

Making "Tuiles" is all about technique and aquiring new fundamentals in pâtisserie decorating rather than about testing your baking skills...

I chose to follow Dutch Master Chef Angélique Sch
meinck's recipe and decided to create my own filling which is very much inspired by the one used for the great Sicilian pastry dessert named "Cannoli". While this recipe is very easy to put into execution, the real "difficulty" lies within the shaping process.
Although the molding of the baked "Tuiles" isn't really problematic nor laborious, the process is nonetheless quite tricky as one needs to be patient and delicate.

Even if my "Tuiles" turned out well, I wasn't too thrill
ed with the results as they were kind of rubbery, no matter how long I baked them (10 minutes with brown edges) nor how thin I spread the batter. The cookies never really wanted to get crispy enough.

Anyway, these "Tuiles" tasted great and eventhough
they weren't as friable and crunchy as I expected, they nevertheless presented well and made wonderful pastry cups in which to contain my luscious "Orange Praline Ricotta Mousse". A delightful dessert!

I really want to thank Karen of "Bake My Day" (Netherlands) and Zorra of "1x Umruehren Bitte" (Switzerland now living in Spain) for having chosen that great recipe and for expanding my baking knowledge!

~ Tuiles With Orange Praline Filling ~
"Tuiles" recipe taken from “The Chocolate Book” by Angélique Schmeinck and "Orange Praline Ricotta Mousse" recipe created by Rosa @ Rosa's Yummy Yums 2009.

Yields 8-10 tuiles.

Ingredients for the "Tuiles":

65g (1/4 Cup) Softened butter (not melted but soft)
60g (1/2 Cup) Sifted confectioner’s sugar
1 Packet Vanilla sugar (7g or substitute with a dash of pure vanilla extract)
2 Large egg whites, slightly whisked with a fork
65g (1/2 Cup) Sifted all purpose flour
1 Tbs Cocoa powder or food coloring of choice (optional)
Butter or spray, to grease baking sheet

Ingredients for the "Orange Praline Ricotta Mousse":
250g (1 Cup) Fresh ricotta
1/2 Tsp Pure vanilla extract or paste
1/8 Cup Confectioner's sugar
3 Tbs Candied orange rind, finely chopped
1/5 Tsp Ground cinnamon A pinch Ground nutmeg
1 Tbs grand Marnier or Cointreau
3 Tbs Thick cream (35% fat)
3 1/2 Tbs Praline powder (see recipe)
3/4 Cup (180g/ml) Thick cream (35% fat), whipped

Method for the "Tuiles":
1. Preheat the oven to 180° C (350° F).
2. Using a hand whisk or a stand mixer fitted with the paddle (low speed), cream the butter, sugar and vanilla until to a paste.
3. Keep stirring while you gradually add the egg whites.
4. Add the flour in small batches and stir to achieve a homogeneous and smooth batter (Be careful to not overmix).
5. Cover the bowl with plastic wrap and chill in the fridge for at least 30 minutes to firm up.
6. Line a baking sheet with parchment paper or grease with either butter/spray
and chill in the fridge for at least 15 minutes (this will help spread the batter more easily if using a shaped stencil/cardboard ).
7. Press the stencil on the bakingsheet and use an off sided spatula to spread batter (leave some room in between your shapes).
8. Bake butterflies in a preheated oven for about 5-10 minutes or until the edges turn golden brown.
9. Immediately release from bakingsheet and proceed to shape/bend the cookies in the desired shape (see remarks).
10. Let cool.

Method for the "Orange Praline Filling":
11. Beat the ricotta until smooth and fluffy.
12. Add all ingredients (apart from the whipped cream) and mix well.
13. Delicately fold in the whipped cream.
14. Pipe the filling into the cup-shaped tuiles.

Remarks:
This batter will keep in the fridge for up to a week, take it out 30 minutes before you plan to use it. If you want to decorate your tuiles, mix a small part of the batter with the cocoa and a few drops of warm water until evenly colored (or coloring). Use this colored batter in a paper piping bag and proceed to pipe decorations on the wings and body of the butterfly.
These cookies have to be shaped when still warm, you might want to bake a small amount at a time or maybe put them in the oven to warm them up again. Or: place a bakingsheet toward the front of the warm oven, leaving the door half open. The warmth will keep the cookies malleable.
Shape the tuiles, using for instance a rolling pin, a broom handle, cups, cones…. If you don’t want to do stencil shapes, you might want to transfer the batter into a piping bag fitted with a small plain tip and pipe the desired shapes and bake or spoon the batter (use 1 1/2 tbs batter per tuile) onto the baking sheets (the cookies should be at least 2 inches/5cm apart, as they spread during baking).

Serving suggestions:
This dessert is good at any time of the day, with a good glass of dessert wine or a cup of tea/coffee.

Etant donné la longueur du texte original, je n'ai malheureusement pas pu faire une traduction française de ce billet et je m'en excuse auprès de tous mes amis lecteurs et blogueurs francophones!

******************

C'est pourquoi je vous suggère de vous rendre sur les blogs mentionnés ci-dessous. Vous y trouverez cette recette en version française.

Chez Vibi de "La Casserole Carrée" (Canada)
Chez Sandra de "Le Pétrin" (France)

Monday, January 26, 2009

HAPPY LUNAR NEW YEAR - 恭喜发财

Today, we are leaving the year of the rat behind in order to enter the year of the ox (more info regarding the Vietnamese Tet can be found here and more info concerning the Chinese Lunar New Year can be found here).

On this occasion, I send you my best wishes for the Lunar New Year ans say "Gong Xi Fa Cai" or "Chúc Mừng Năm Mới"! May this sign bring you luck, prosperity, health and happiness in life...

My Chinese & Vietnamese recipes:
Cantonese Lemon Chicken (see recipe)
Chinese Steamed Fish (see recipe)
Chinese White Sugar Sponge (see recipe)
Nian Gao/Chinese New Year Steamed Cake (see recipe)
Vietnamese Chicken And Grapefruit Salad (see recipe)
Vietnamese Stuffed Pancakes (see link)

Interesting links:
About.com (see link)
All Recipes (see link)
Bon Appétit (see link)
Delicious (see link)
Epicurious (see link)
Food and Wine (see link)
Foodnetwork (see link)
Gourmet Traveller (see link)
My Recipes (see link)
Razzle Dazzle (see link)
Saveur (see link)
Viet World Kitchen (see link)

For more Asian recipes, then click here and browse through my recipe collection...

Saturday, January 24, 2009

WEEKEND CAT BLOGGING #190

This week, Kashim and Othello at "Paulchens FoodBlog" (Austria) are happy to announce that they are hosting Weekend Cat Blogging #190...

To submit your kitty picture(s), you can either leave a message in their blog's comment section (with your permalinks) or contact them via e-mail without forgetting to give all the needed information.

"When the tea is brought at five o'clock
And all the neat curtains are drawn with care,
The Little black cat with bright green eyes
Is suddenly purring there."
~ Harold Monro ~

Friday, January 23, 2009

THE BRIGHT SIDE OF WINTER

Although, during the cold season, we rarely get much sunshine (mostly fog and rain), sometimes, we are occasionally blessed with sunny days...

On Sundays, when we are lucky enough to get azure blue skies and bright light, I always try to go out for a walk in order to capture the essence of winter (and get some exercise). It results in interesting and atmospheric landscape pictures. Enjoy!

Wednesday, January 21, 2009

KIPPER RILLETTES - RILLETTES DE HARENG

I'm a big fan of spreads and pastes as they are very practical, tasty and versatile. What makes them very exciting is that they can be paired with so many different accompaniments such as bread, crackers, savory biscuits, vegetables sticks and even with pasta or boiled potatoes. The association possibilities are endless...

I've also always loved smoked kipper fillets
(in a tin/Appel brand) as they are healthy, incredibly delicious, cheap, very convenient and can be used in so many ways in order to make quick, easy, toothsome as well as quality meals...

So, for the farewell dinner that we organized on the o
ccasion of our friends Jessica (see her blog "In Search Of Desssert") & Jonathan's definitive departure from Switzerland (they are going to start a new life in Austin, Texas), I decided that it would be a good idea to whip up some lip-smackingly luscious "Smoked Herring (Kippers) Rillettes" in order to serve them with my delightful "Hazelnut Golden Raisin Baguette" (see The King Arthur Flour recipe here).

These scrumptious and well-balanced rillettes were very popular and so was the bread. Both disappeared very rapidely. A real delicacy!

~ Smoked Herring (Kipper) Rillettes ~
Recipe by Rosa @ Rosa's Yummy Yums 2009

Makes enough paste to fill 5 espresso cups.

Ingredients:

125g Smoked herring fillets (tin), drained
150g Cream cheese
1/2 Tsp Preserved lemon puree (see remarks)
1 1/2 Tbs Lemon juice
2 Tsps Capers, washed, drained and coarsely chopped
1/4 Tsp Piment d'Espelette (see remarks)
1 Pinch Paprika
1/2 Tsp Walnut oil (optional)
20g Chives, finely chopped
Salt, to taste
Pepper, to taste

Method:
1. With the help of a fork, crumble the fish fillets very finely.
2. Add all the other ingredients and work the mixture into a homogenous paste.
3. Pipe the paste (or drop spoonfulls of it) into es
presso cups.
4. Refrigerate 1 hour before serving (see
remarks).

Remarks:
To make the preserve lemon puree, take a slice/piece preserved lemon and puree it with a fork. If you don't have any preserved lemons, just use the same quantity grated lemon.
Piment d'Espelette or Espelette pepper
s is a Basque chili powder. If you can't find any, use the same quantity of any chili powder.
I recommend you to keep the rilletttes in the fridge, overnight as the flavors tend to develop better that way.

Serving suggestions:
Serve this spread with "Lavash Crackers"
, "Oatcakes", "Smoky Chili Crackers", "Tiny Curry Scones", "Matzoh Sheets" or homemade bread (see bread recipes).

***************

~ Rillettes A l'Harreng Fumé ~
Recette par Rosa @ Rosa's Yummy Yums 2009.

Pour 5 tasses à espresso.

Ingrédients:
125g de Filets de hareng fumé (conserve), égouttés
150g de Cream cheese (type Philadelphia)
1/2 CC de Purée de citron confit (voir remarques)
1 1/2 CS de Jus de citron
2 CC de Câpres, lavées, égouttées et hachées grossièrement
1/4 CC de Piment d'Espelette
1 Pincée de Paprika
1/2 CC d'Huile de noix (en option)
20g de Ciboulette, finement hachée
Salt, à volonté
Poivre, à volonté

Méthode:
1. A l'aide d'une fourchette, émietter (finement) les filets.
2. Ajouter tous les autres ingrédients et bien mélanger afin d'obtenir une pâte homogène.
3. Remplir chaque tasse à l'aide d'une poche à douille (ou à la cuillère).
4. Réfrigérer au moins une heure avant de servir.

Remarques:
Ecraser le morceau de citron confit à l'aide d'une fourchette, ainsi vous obtiendrez une purée. Si vous n'avez pas de citrons confits, alors utilisez la même quantité de zeste de citron.
Le Piment d'Espelette est une poudre de piments doux en provenance du pays basque
. Si vous n'en trouvez pas, alors vous pouvez utiliser la même quantité de piment en poudre.
Je vous recommande de garder les rillettes pendant au moins toute une nuit au frigo car, de cette manière, les saveurs se développent mieux.


Idées de présentation:
Servez ces rillettes avec des "Crackers Lavash", des "Palets A l'Avoine/Oatcakes", des "Crackers Au Piment Fumé", des "Minis Scones Au Curry", du "Pain Azyme" ou du pain maison (voir mes recettes).

Monday, January 19, 2009

MY EARLY YEARS AS A FOODIE

Mr. & Ms. Bloga2 (France) have had the great idea to launch a new game (see link in French). Both of them want us to go through our photo albums and choose one or two pictures of ourselves, when we were kids, so I thought that I'd just play along and show how the 3 year toddler that I was looked, back in the "old" times (~1981)...

Madame et Monsieur Bloga2 (France) ont eu la bonne idée d
e lancer un jeu qui nous replongera avec nostalgie dans notre enfance (voir jeu), alors, aujourd'hui vous avez le droit de me voir lorsque j'e nétais qu'une gamine de 3 ans (~1981)...

Saturday, January 17, 2009

WEEKEND CAT BLOGGING #189

This week, Miz Mog and Kitties at "Mind of Mog" (USA) are happy to announce that they are hosting Weekend Cat Blogging #189...

To submit your kitty picture(s), you can either leave a message in their blog's comment section (with your permalinks) or contact them via e-mail without forgetting to give all the needed information.

Two days ago, Fridolin got really sick (apathetic, silent, like drugged, not hungry & no energy).
As he is soon 14 years old (in April) we were afraid that his illness was due to his "advanced" age and that he had something serious (kidney problems or diabetes)...
Yesterday, I had to call a home visiting veterinary (very practical).
He did two injections (cortisone and vitamin b) and prescribed antibiotics.
It seems that he had got intoxicated by something.
Now, the Fridolin we know is back.
He's active, talkative and hungry again, yippee!!!!

Friday, January 16, 2009

COLD, FOGGY DAYS

Last Sunday, a foggy and bitter cold day. In the fields, a few minutes walk away from my home. Everything is touched by the icy hand of winter, but in fact, nothing is as dead as it seems. The signs of upcoming spring are already visible...

Wednesday, January 14, 2009

BUTTERMILK HONEY BREAD - PAIN

Since the day I received Beth Hensperger's "The Bread Bible" (for my birthday last year), I have baked some of the most scrumptious loaves ever...

Until now I have not been disappointed by any
of her gorgeous breads. All her recipes are flawless and give extremely good results. As a matter of fact, I am constantly picking up my copy of her cookbook in order to try something new and exciting.

The "Butter
milk Honey Bread" I'm going to talk about today is a real classic because it can be made fastly, it doesn't require many ingredients, nor does it contain too much fat and is incredibly delicious. I always tend to make this loaf whenever I don't want to spend much time in the kitchen, but don't want to eat store-bought bread nor be frustrated by an uninteresting baker's creation.

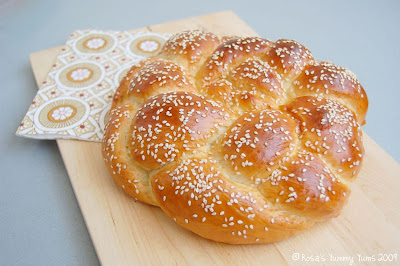
I'm sure most of you will enjoy this beautiful bread's incredible fluffiness and de
lightful softeness (nearly like a brioche or like Challah Bread) as well as it's marvelous taste. It can be served with anything and shaped as desired. You can even toast it or make savory and sweet swirled breads with the dough...

A "Buttermilk Honey Bread
" that'll not leave you cold and will increase your desire to bake more often!

~ Buttermilk Honey Bread ~
Recipe taken from Beth Hensperger's "The Bread Bible".

Makes 2 23x13 (9x5-inch) pan loaves or 2 freestyle round loaves.

Ingredients:
3/4 Cup (180g/ml) Warm water (105°-115° F/40.5°-46° C)
1 Tbs (1 envelope/7g) Active dry yeast
1 Tsp Castor sugar
1 1/2 Cups (360g/ml) Buttermilk, warmed just to take off the chill (alternatively, brought up to room temperature)
2 Tbs (30g) Unsalted butter, melted
3 Tbs Runny honey
1 Tbs Salt 6-6 1/4 Cups (765g-768g) Unbleached all-purpose flour
Ingredients for the "Rich Egg Glaze":
1 Egg, beaten, with 1 Tbs Milk or cream

Method:
1. Pour warm water into a small bowl.
2. Sprinkle yeast and sugar over the surface of the water.
3. Stir to combine and let stand until foamy, about 10 minutes. Cover with a dish towel.
4. In a large bowl (or in the work bowl of a standing mixer fitted with a paddle attachment), add buttermilk, butter, honey and yeast mixture, and stir to combine.
5. Add salt and 2 cups flour. Beat hard to combine.
6. Add remaining flour, 1/2 cup at a time, beating with a wooden spoon or rubber spatula after each addition, until a shaggy dough is formed.
7. Turn dough out onto a lightly floured work surface and knead about 5 minutes, until dough is smooth and satiny (if kneading by machine, switch from paddle to dough hook and knead for 3-4 minutes, or until dough is smooth and springy).
8. Place dough in a greased bowl. Turn dough once to grease the top and cover with plastic wrap.

9. Let rise at room temperature until double in bulk, 60-75 minutes.
10. Gently deflate dough with your fist. Turn dough out on a lightly floured work surface.
11. Grease two 23x13cm (9-by-5 -inch) loaf pans or a baking sheet for freestyle round loaves. Cover lightly with plastic wrap or a towel and let rise until fully doubled in bulk, 30-45 minutes. 12. Twenty minutes before you put the bread in the oven, preheat oven to 190° C (375° F).
13. Brush top of loaves with egg glaze.
14. Put pans on the center rack of the oven and bake about 45 minutes, or until loaves are brown, pull away from sides and sound hollow when tapped with your finger.
15. Remove loaves immediately to a cooling rack. Cool completely before slicing.

Remarks:
While kneading the bread, don't forget to dust your work surface with flour (only 1 Tbs at a time) if the dough tends to by sticky.
I shaped my loaves into coiled braids (make a long braid first and then coil).
Once you have brushed the loaves with the egg glaze, you can sprinkle them with the seeds of your choice (poppy seeds, sesame seeds, sunflower seeds, pumpkin seeds, etc...).

Serving suggestions:
This bread is delicious with almost anything (cheese, jam, pâté, etc…) and can be enjoyed at any time of the day.

To see another Beth Hensperger recipe, click here.

***************

~ Pain Au Babeurre Et Au Miel ~
Recette tirée du livre "The Bread Bible" de Beth Hensperger.

Pour 2 pains rectangulaires de 23x13cm.

Ingrédients:
3/4 de Tasse (180g/ml) d'Eau tiède (à pas plus de 46° C)
1 CS (ou un sachet de 7g) de Levure sèche
1 CC de Sucre cristallisé
1 1/2 Tasses (360g/ml) de Babeurre (lait ribot), à température ambiante
2 CS (30g) de Beurre non-salé, fondu
3 CS de Miel coulant
1 CS de Sel 6-6 1/4 (765g-768g) de Tasses de Farine blanche/fleur
Ingrédients pour le "Glaçage A l'Oeuf":
1 Oeuf, battu, mélangé à 1 CS de Lait ou de crème

Méthode:
1. Verser l'eau dans un petit bol.
2. Saupoudrer avec la levure et le sucre.
3. Bien mélanger et laisser reposer pendant 10 minutes, jusqu'à ce que le mélange soit mousseux.
4. Dans un grand bol (ou dans le bol d'un robot électrique avec le fouet pour battre), ajouter le babeurre, le beurre, le miel et le mélange eau/sucre/levure, puis bien mélanger (au fouet).

5. Ajouter le sel et 2 tasses de farine à la fois. Battre (au fouet) le tout afin que ça soit bien mélangé.
6. Ajouter la farine restante, 1/2 tasse à la fois, tout en battant (avec une cuillère en bois ou une spatule) la préparation après chaque ajout, afin d'obtenir une pâte visqueuse.
7. Mettre la pâte sur votre surface de travail légèrement farinée et la pétrir pendant 5 minutes (si vous pétrissez votre pâte au robot, utilisez votre crochet pétrisseur et pétrissez-la pendant 3-4 minutes, ou jusqu'à ce qu'elle soit douce et élastique).
8. Mettre la pâte dans un grand bol légèrement huilé/beurré et faites tourner la pâte dans le bol afin de bien l'enduire d'huile/de beurre. Couvrir avec du film alimentaire, puis avec un linge.
9. Laisser lever, à température ambiante, jusqu'à ce que la pâte ait doublé de volume, pendant 60 à 75 minutes.
10. Dégonfler la pâte et la mettre sur une surface farinée.
11. Graisser/beurrer deux moules de 23 X 13cm et diviser la pâte en deux parts égales ou former des pains ronds "freestyle". Couvrir avec un linge ou une feuille de film plastique et laisser lever pendant 45 minutes, jusqu'à ce que le pain ait doublé de volume.
12. Vingt minutes avant d'enfourner le pain, préchauffer le four à 190° C (375° F).
13. Juste avant d'enfourner vos pains, badigeonnez-les avec le glaçage à l'oeuf.
14. Cuire pendant 45 minutes, jusqu'à ce qu'ils soient dorés et sonnent creux.
15. Sortir les pains des moules et les faire reffroidir sur une grille avant de les déguster.

Remarques:
Lors du pétrissage, si votre pâte colle, saupoudrer la d'un peu de farine (1 CS à la fois) sur votre plan de travail.
Pour donner cette forme spéciale à mes pains, j'ai d'abord tressé ma pâte (faites une longue tresse), puis j'ai formé un escargot avec ma tresse.
Après avoir badigeonné vos pains, vous pouvez aussi les saupoudrer avec des graines (pavot, sésame, tournesol, courge, etc...).

Idées de présentation:
Ce pain est délicieux avec presque n'importe quoi (fromages, pâtés, confitures...) et peut être mangé à toute heure de la journée.

Pour voir une autre recette de Beth Hensperger, cliquer ici.

Monday, January 12, 2009

THE 12 BEST RECIPES OF 2008

As a new year has started, I have decided to look back at 2008 and make a list of the twelve (actually 14) recipes which have left a mark on me...

Etant donné qu'une nouvelle année a commencé, j'ai décidé de regarder en arrière et de choisir 12 (en réalité 14) recettes qui ont marqué 2008...

January - Janvier Gravlax Or Salt-Cured Salmon from Sweden (recipe by Chef Marcus Samuelsson) Gravlax, spécialité suédoise (recette par Chef Marcus Samuelsson)

February - Février
Fish Rendang from Malaysia (Recipe taken from "Easy Malaysian-Style Cookery" by The Australian Women's Weekly and adapted by Rosa @ Rosa's Yummy Yums)
Rendang De Poisson, spécialité malaise (Recette tirée de "Easy Malaysian-Style Cookery" par The Australian Women's Weekly et adaptée par Rosa @ Rosa's Yummy Yums)

March - Mars
Artisan French Bread from France (Recipe taken from "Mastering the Art of French Cooking: Volume Two" by Julia Child and Simone Beck)
Baguette Parisienne, spécialité française (Recette tirée de "Mastering the Art of French Cooking: Volume Two" de Julia Child et Simone Beck)

April - Avril
Ajvar Dip from the Balkan/Switzerland (Recipe by Rosa @ Rosas Yummy Yums 2008)
Dip a l'Ajvar, spécialité des Balkans et de Suisse (Recette par Rosa @ Rosas Yummy Yums 2008)

May - Mai
Lemony Beef & New Potato Tagine from Marocco (Recipe by Rosa @ Rosas Yummy Yums 2008)
Tajine Au Boeuf, Pommes De Terre Nouvelles et Citron Confit, spécialité marocaine (Recette par Rosa @ Rosas Yummy Yums 2008)


June - Juin
Danish Braid from Denmark (Recipe by Sherry Yard "The Secrets of Baking")
Tresse Danoise, spécialité danoise (Recette par Sherry Yard "The Secrets of Baking")

July - Juillet
Dukkah Spice Blend from Egypt (Recipe taken from the magazine "Australian Women's Weekly" and adapted by Rosa @ Rosa's Yummy Yums 2008)
Dukkah, spécialité égyptienne (Recette tirée du magazine "Australian Women's Weekly" et adaptée par Rosa @ Rosa's Yummy Yums 2008)

August - Août
Feta, Almond & Cilantro Pesto from Italy (Recipe by Rosa @ Rosas Yummy Yums 2008) Pesto Aux Amandes, A La Coriandre Et A la Feta, spécialité italienne (Recette par Rosa @ Rosas Yummy Yums 2008)

September - Septembre
Moroccan Charoset Truffles from Morocco (Recipe taken from "Jewish Cooking In America" by Joan Nathan and adapted by Rosa @ Rosa's Yummy Yums)
Charoset, spécialité marocaine (Recette tirée du livre "Jewish Cooking In America" de Joan Nathan et adaptée par by Rosa @ Rosa's Yummy Yums)

October - Octobre
Basic Pizza Dough from Italy (Recipe taken from “The Bread Baker’s Apprentice” by Peter Reinhart)
Pâte A Pizza, spécialité italienne (Recette tirée du livre “The Bread Baker’s Apprentice” de Peter Reinhart)

or/ou

Dark Chocolate & Peanut Butter Cupcakes from USA ("Dark Chocolate Cupcakes" recipe by Magnolia Bakery "The Magnolia Cookbook", "Peanut Butter Frosting" by Alisa Huntsman "Sky High: Irresistable Triple-Layer Cakes" & adapted by Rosa @ Rosa's Yummy Yums) Cupcakes Au Chocolat Noir Et Au Peanut Butter, spécialité américaine (Recette pour les cupcakes par Magnolia Bakery "The Magnolia Cookbook", recette pour le glaçage par Alisa Huntsman "Sky High: Irresistable Triple-Layer Cakes" toutes les deux adaptées par Rosa @ Rosa's Yummy Yums)

November - Novembre

Caramel Cake With Caramelized Butter Frosting from USA (
Recipe by Shuna Fish Lydon)
Cake Au Caramel, spécialité américaine (Recette par Shuna Fish Lydon)

or/ou

Pumpkin Bread Pudding from USA (Recipe from "Bon Appétit" and adapted by Rosa @ Rosa's Yummy Yums)

Pudding Au Potimarron, spécialité américaine (Recette tirée du magazine "Bon Appétit" et adaptée par Rosa @ Rosa's Yummy Yums)

December - Décembre
Macarons With Chocolate And Peanut Butter Ganache from France (
Recipe by Helen at "Tartelette" (USA) and adapted by Rosa @ Rosa's Yummy Yums)
Macarons Au Chocolat Et Au Peanut Butter, Spécialité française (Recette par Helen de "Tartelette" (USA) et adaptée par Rosa @ Rosa's Yummy Yums)

Let's see what this year will bring in terms of exciting food and culinary discoveries!