Sunday, May 30, 2010

PROMISING LANDSCAPES

Well, lately I have not been posting very actively on my blog as I have taken a little holiday (1 week). I'm awfully sorry for having let you down (to tell you the truth, I felt slightly guilty about doing so), but one sometimes needs a bit of time for herself...

Anyway, next week I will blog like usual (ladscape shots, recipe and Weekend Cat Blogging). In the meantime, here is a shot of the place I travelled to on Tuesday. I hope it'll sharpen your curiosity as they'll be more pictures of that wonderful region next week.

Thursday, May 27, 2010

CROQUEMBOUCHE - THE DARING BAKERS


When seeing the date on my calender, I had to curse. I could not believe that in less than a day it would be the 27th of May and that all members of the Daring Bakers' would be blogging about their latest creation, yet I still had not started making this month's challenge. Once again, I did not manage to start baking in advance for the event and had to run at the last minute in order to be able to blog about it on time. I cannot believe that the 27th has already arrived...

The May 2010 Daring Bakers’ challenge wa
s hosted by Cat of "Little Miss Cupcake". Cat challenged everyone to make a "Piece Montée", or "Croquembouche", based on recipes from Peter Kump’s Baking School in Manhattan and Nick Malgieri.

Well, to tell you the truth, for this very challenge I was not the least stressed by the work that was awaiting nor apprehensive about the idea of putting together a "Pièce Montée" because making choux pastry (remember my DB post about "Chocolate Éclairs"), pastry cream or caramel was nothing new to me. Most Daring Bakers members have already made one or the other during the course of the last months.

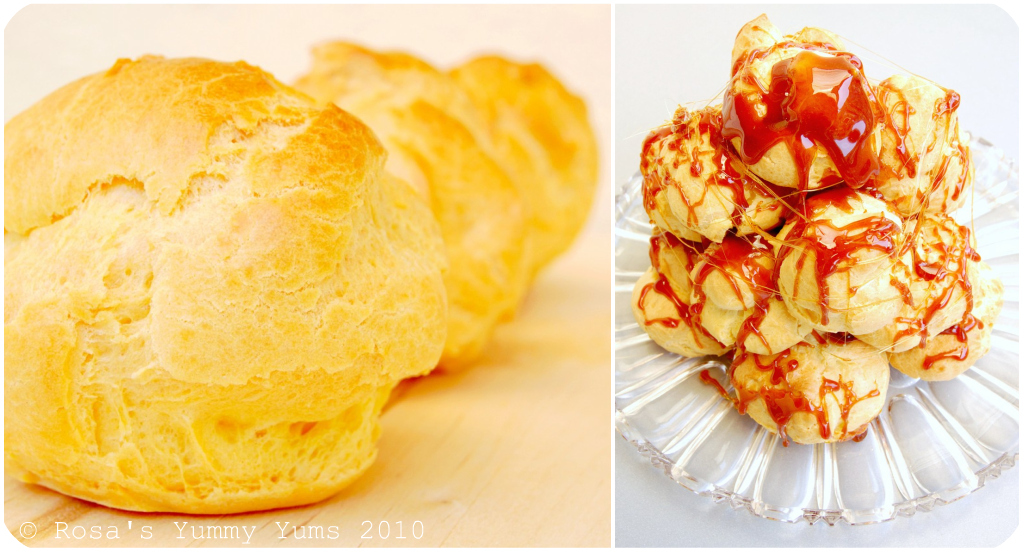
I thought to myself "Finely, this recipe is not going to cause any trouble". Well, as incredible as it might seem
, I did come across a very annoying problem while making my cream puff shells. My first batch was a total flop. The cream puff shells looked so sad and were flat like omelets. this made me slightly panick and question my capacities as a baker. it was one of those moments when you lose all self-confidence and blame yourself for the bad results. I mean, boy were they fugly and totally unusable!

After doing a little research, I realized that if they had this saggy shape it was due to the
fact that the pastry was far too wet. So, for my second attempt at making cream puff shells I decided to use smaller eggs (53g instead of 63g), thus incorporating less liquid to the choux pastry. My second batch was just perfect. The cream puff shells came out all puffy and looked very pretty. Phew!

The cream puffs shells rose beautifully, were crispy on the outside and soft on the inside. They tasted of butter and reminded me of popovers. As I wanted to give a summery flavor to my cream puffs, I chose to make lemon pastry cream. Needless to say that the pastry cream was delightfully fresh and irresistibly silky smooth. In order to stick the cream puffs together, I opted for the caramel glaze wich added a layer of oomph to the whole dessert and gave a dramatic look to the pièce montée.

I wish to thanks Cat for having chosen that awesome treat and for giving me the opportunity to prove to myself that I have the skills to put together such a festive dessert. I will certainly make this goodie very soon again!
~Pièce Montée or Croquembouche ~

Equipment required:
• Several baking sheets
• Parchment paper
• A whisk
• A pastry brush (for the egg wash)
• A pastry bag and tip (a plain tip or no tip is best for piping the puff pastry; you can use a plain or star tip to fill the puff pastry with the cream)
• A flat surface such as a baking sheet or cake board/stand on which to assemble your piece montée
• Some of the items you may want to use to decorate your piece montée include ribbons, Jordan almonds, fresh flowers, sugar cookie cut-outs, chocolates, etc.

~~~~~~~~~~~~~~~~~~~~~~

LEMON CRÈME PÂTISSIÈRE

Ingredients:
1 Cup (225ml) Whole milk
2 Tbsp Cornstarch
6 Tbsp (100g) Sugar
1 Large egg
2 Large egg yolks
2 Tbsp (30G) Unsalted butter
1 Tsp Natural vanilla extract
3/4 Tsp Pure lemon extract

Method:
1. Dissolve cornstarch in 1/4 cup of milk. Combine the remaining milk with the sugar in a saucepan; bring to boil; remove from heat.
2. Beat the whole egg, then the yolks into the cornstarch mixture.
3. Pour 1/3 of boiling milk into the egg mixture, whisking constantly so that the eggs do not begin to cook.
4. Return the remaining milk to boil. Pour in the hot egg mixture in a stream, continuing whisking. Continue whisking (this is important – you do not want the eggs to solidify/cook) until the cream thickens and comes to a boil.
5. Remove from heat and beat in the butter and vanilla. Pour cream into a stainless steel/ceramic bowl. Press plastic wrap firmly against the surface.
6. Chill immediately and until ready to use.

For Chocolate Pastry Cream:
Bring 1/4 cup (about 50 cl.) milk to a boil in a small pan; remove from heat and add in 3 ounces (about 80 g.) semisweet chocolate, finely chopped, and mix until smooth. Whisk into pastry cream when you add the butter and vanilla.
For Coffee Pastry Cream:
Dissolve 1 ½ teaspoons instant espresso powder in 1 ½ teaspoons boiling water. Whisk into pastry cream with butter and vanilla.

~~~~~~~~~~~~~~~~~~~~~~

PÂTE A CHOUX

Yields about 28.

Ingredients:
3/4 Cup (175ml) Water
6 Tbsp (85g) Unsalted butter
1/4 Tsp Sea salt
1 Tbsp Sugar
1 Cup (125g) All-purpose flour
4 Large eggs (~53g)
1 Egg & A pinch of salt (for egg wash)

Method:
1. Pre-heat oven to 220◦C (425° F). Line two baking sheets with parchment paper.
2. Combine water, butter, salt and sugar in a saucepan over medium heat. Bring to a boil and stir occasionally.
3. At boil, remove from heat and sift in the flour, stirring to combine completely.
4. Return to heat and cook, stirring constantly until the batter dries slightly and begins to pull away from the sides of the pan.
5. Transfer to a bowl and stir with a wooden spoon 1 minute to cool slightly.
6. Add 1 egg (The batter will appear loose and shiny). As you stir, the batter will become dry-looking like lightly buttered mashed potatoes. It is at this point that you will add in the next egg. Repeat until you have incorporated all the eggs.
7. Transfer batter to a pastry bag fitted with a large open tip (I piped directly from the bag opening without a tip). Pipe choux about 1 inch-part in the baking sheets (Choux should be about 1 inch high about 1 inch wide). Using a clean finger dipped in hot water, gently press down on any tips that have formed on the top of choux when piping. You want them to retain their ball shape, but be smoothly curved on top.
8. Brush tops with egg wash (1 egg lightly beaten with pinch of salt).
9. Bake the choux at 220◦C (425° F) until well-puffed and turning lightly golden in color, about 10 minutes.
10. Lower the temperature to 180◦ C (350° F) and continue baking until well-colored and dry, about 20 minutes more.
11. Remove to a rack and cool.

Remarks:

They can be stored in a airtight box overnight.

~~~~~~~~~~~~~~~~~~~~~~


FILLING THE CHOUX

Method:
1. When you are ready to assemble your piece montée, using a plain pastry tip, pierce the bottom of each choux. Fill the choux with pastry cream using either the same tip or a star tip, and place on a paper-lined sheet (Choux can be refrigerated briefly at this point while you make your glaze).

~~~~~~~~~~~~~~~~~~~~~~~

HARD CARAMEL GLAZE

Ingredients:

1 Cup (225g) Sugar
1/2 Tsp Lemon juice

Method:

1. Combine sugar and lemon juice in a saucepan with a metal kitchen spoon stirring until the sugar resembles wet sand.
2. Place on medium heat; heat without stirring until sugar starts to melt around the sides of the pan and the center begins to smoke.
3. Begin to stir sugar. Continue heating, stirring occasionally until the sugar is a clear, amber color.
4. Remove from heat immediately; place bottom of pan in ice water to stop the cooking. Use immediately.

~~~~~~~~~~~~~~~~~~~~~~~~


ASSEMBLING THE PIÈCE MONTÉE

You may want to lay out your unfilled, unglazed choux in a practice design to get a feel for how to assemble the final dessert.
For example, if making a conical shape, trace a circle (no bigger than 8 inches) on a piece of parchmen
t to use as a pattern. Then take some of the larger choux and assemble them in the circle for the bottom layer.
Pr
actice seeing which pieces fit together best.

Method:
1. Once you are ready to assemble your piece montée, dip the top of each choux in your glaze (careful it may be still hot!), and start assembling on your cake board/plate/sheet.
2. Continue dipping and adding choux in levels using the glaze to hold them together as you build up. (You may want to use toothpicks to hold them in place).
3. When you have finished the design of your piece montée, you may drizzle with remaining glaze or use ribbons, sugar cookie cut-outs, almonds, flowers, etc. to decorate.

~~~~~~~~~~~~~~~~~~~~~~~

Etant donné la longueur du texte original, je n'ai malheureusement pas pu faire une traduction française de ce billet et je m'en excuse auprès de tous mes amis lecteurs et blogueurs francophones!

C'est pourquoi je vous suggère de vous rendre sur le blog mentionné ci-dessous. Vous y trouverez cette recette en version française.

Chez Isa de "Les Gourmandises d'Isa" (Canada)
Chez Vibi de "La Casserole Carrée" (Canada)

Sunday, May 23, 2010

STRAWBERRY & RHUBARB CRUMBLE


In the past, I was hyper reluctant to cook strawberries. I thought that they'd end up tasting like strawberry jam (which I've never really enjoyed) if I did so. I love strawberries, but the sweet nearly sickly flavor of strawberry has always put me off. I was never one of those people who went crazy over a pot of strawberry jam. Quite the contrary! I am the kind of person who loves the taginess of apricot, black currant or Italian plum jams...

That was before my encounter with English television chef Tamasin Day-Lewis' "Strawberry & Rhubarb Crumble" recipe in the May issue of my Bon Appétit magazine. Then, I knew that I was ready to give cooked/baked strawberries a try. When mixed with rhubarb, cooked strawberries lose their cloying aspect, so there was no way they were going to be a problem for me. Rhubarb is the best partner for strawberries. Both complement each other perfectly.

At the moment we are getting the most perfumed strawberries from Italy, so I have been eating that lovely fruit almost on a daily basis. (strawberry fever, baby!). Not to forget that it is also the high season for Swiss rhubarb which has to be one of my favorite veggies (yes it is a vegetable!) ever. How could one resist eating both of them together? Nobody, I'm pretty sure.

And to tell you the truth, I now am addicted to cooked/baked stra
wberries in desserts! That crumble converted me totally and made me change my mind (well, I am still not a big fan of strawberry jam though, but I might reconsider my position later...). As a matter of fact, I have made different variations of that "Strawberry & Rhubarb Crumble" three times in a row/week!

The recipe I am going to share with you today was created for the meal
(starter: green asparagus with a pistachio & fresh garlic vinaigrette, main course: gnudi di spinaci e ricotta) I had prepared with much care for my friend Corinne and is highly inspired by Tamasin Day-Lewis' crumble recipe (the original recipe has been turned around and newly adapted by myself).

Well, Corinne who loves rhubarb cleaned her dessert plate in no time and without effort! This crumble is just irresistibly heavenly. The topping is mouthwateringly crispy, delightfully buttery and pleasantly oaty, the middle is decadently gooey and incredibly puddingy and the bottom is marvelously juicy, wonderfully fruity as well as exhaliratingly fragrant. Totally awesome and to die for!


~ Strawberry & Rhubarb Crumble ~
Recipe inspired by Tamasin Day-Lewis and adapted by Rosa @ Rosa's Yummy Yums 2010 .

Ingredients:
200g (1 1/2 Cups + 1 Tbs) All purpose flour
100g (1/2 Cup) + 140g (2/3 Cup) Castor sugar
1/2 Tsp Sea salt
100g (1/2 Cup) Unsalted butter, cold & cut into 1.5cm (1/2-inch) cubes
2-3 Tbs Old-fashioned oats
2 Tsp Natural vanilla paste
1 Tsp Ground cinnamon
4 Cups (1 pound) Strawberries, hu
lled, halved (or cut in 4 if very big)
12 oz (360g) Red rhubarb, ends trimmed, stalks cut crosswise into 1.5cm (1
/2-inch) -thick pieces

Method:
1. Combine the flour, 100g sugar and salt in medium bowl. Whisk to blend.
2. Add the butter and rub it in with your fingertips until the mixture ressemble corse sand/pebbles.
3. Add the oats and mix well.
4. Preheat the oven to 190° C (375° F).
5. Butter a 28x18x5cm (11x7x2-inch) baking dish.
6. Place the fruits in a big bowl, add the vanilla, cinnamon and 140g sugar in large bowl.
7. Toss delicately to coat well.
8. Scrape the fruit filling into the prepared baking dish.
9. Sprinkle the crumble topping evenly over the filling.
10. Bake the crumble until the filling bubbles thickly and the topping is crisp as well as golden brown, about 45 minutes.
11. Let cool 15 minutes on a wire rack.
12. Spoon the warm crumble into dessert dishes.


Remarks:
The topping can be made 1 to 2 days ahead.
Store the cooled crumble in an airtight container in fridge. It can be kept in the fridge for up to 2 days.

Serving suggestions:
Serve with some ice cream (vanilla, goat's milk, yoghurt, lemon...) or some thick yoghurt (Greek) mixed with a little powder sugar.
This crumble is also delicious when eaten cold (at room temperature) the next day.

~~~~~~~~~~~~~~~~~~~~~~

~ Crumble A La Rhubarbe Et A La Fraise ~
Recette inspirée par Tamasin Day-Lewis et adaptée par Rosa @ Rosa's Yummy Yums 2010 .

Ingrédients:
200g de Farine blanche
100g +140g de Sucre cristallisé
1/2 CC de Sel de mer

100g de Beurre non-salé, très froid et coupé en petits morceaux de 1.5cm

2-3 CS d'Avoine

2 CC de Pâte de vanille naturelle

1 CC de Cannelle en poudre
500g de Fraises, équeutées et coupées en deux (ou en quatre si elles sont grosses)
360g de Rhubarbe (préférablement rose), coupée en morceaux de 1.5cm


Méthode:
1. Mélanger la farine, les 100g de sucre et le sel dans un bol moyen.
2. Ajouter le beurre et l'incorporer avec les doigts afin d'obtenir un mélange sablé grossier.
3. Ajouter l'avoine et bien mélanger.
4. Préchauffer le four à 190° C.
5. Beurrer un plat à gratin de 28x18x5cm.
6. Mettre les fruits dans un grand bol, ajouter la vanille, la cannelle et les 140g de sucre.
7. Mélanger délicatement afin que le sucre et les épices soient bien répartis.
8. Mettre le mélange de fruits dans le plats.
9. Saupoudrer de manière homogène avec le crumble.
10. Cuire le crumble pendant 45 minutes, jusqu'à ce que le mélange aux fruits fasse des bulles et que le dessus soit bien croquant et doré.
11. Laisser refroidir pendant 15 minutes.
12. Servir le crumble dans des assiettes à dessert.

Remarques:
Le crumble (mélange farine/sucre/sel/beurre) peut être préparé à l'avance (1 à 2 jours).
Vous pouvez conserver le crumble au frigo (1 ou deux jours).


Idées de présentation:
Servir ce crumble avec de la glace (vanille, lait de chèvre, yaourt, citron,...) ou avec du yaourt épais (grec) auquel vous ajouterez un peu de sucre en poudre.
Ce crumble est aussi délicieux quand consommé froid (à température ambiante) le jour d'après.

Wednesday, May 19, 2010

HELLO SUN

After more than two weeks of continuous rain and grey weather, it seems that things are getting a little better. Yesterday, I was finally able to eat on my balcony again and to go out for a walk. I had been waiting for that moment with much impatience....

Although the weather is more enjoyable, the temperatures are still very low - consi
dering the fact that it is already the middle of May (14° C) - and we getting a strong Bise (Northern wind). Let's hope it'll be sunny and warm for my holidays (starting this Friday)!


Sunday, May 16, 2010

WEEKEND CAT BLOGGING #258

This week, Breadchick and LB at "The Sour Dough" (USA) are happy to announce that they are hosting Weekend Cat Blogging #258...

To submit your kitty picture(s), you can either leave a message in their blog's comment section (with your permalinks) or contact them via e-mail without forgetting to give all the needed information.

Friday, May 14, 2010

ITALIAN WINE BISCUITS - BISCUITS AU VIN


Not long ago, I bought a couple of cheeses (Red Leicester & Welsh Mature Cheddar) from "Jim's British Market", a British supermarket situated in neighboring France (Saint Genis-Pouilly). As it is not a delicacy we can eat on a weekly basis, we wanted to enjoy those yummy cheeses with a good glass of wine and the appropriate accompaniment...

I also had two wonderful jellies - Green Jalapeño Jelly From Texas, USA
& Vin Santo Jelly from Italy - that I wanted to serve together with some good semi-hard gourmet cheese, it was the perfect opportunity to bake savory lush crackers. So, knowing that my "The King Arthur Flour Baker's Companion: The All-Purpose Baking Companion" contains many great cracker/biscuit ideas, it was without surprise that I found what I was looking for. As expected, the baked goods I made were very successful and turned out right; KAF's recipes are always a safe bet,

Considering the fact that pepper and Porto go very well with Cheddar-style cheeses, it was self-evident that KAF's sophisticated "Italian Wine Biscuits" ("Biscotti Di Vino" in Italian) would be the perfect pairing. Needless to say that we were delighted by their wonderful taste and pleasant texture.

Those dense and bready "Italian Wine Biscuits" are a bit like a cross between crackers (not as hard and flat, though) and scones (not as soft and fluffy either). They are crisp, semisweet biscuits which have a addictive, yet non overpowering peppery fragrance, subtle flavors of red wine and a delicate touch of salt. Terrific!

~ Italian Wine Biscuits ~

Recipe by The King Arthur Flour.


Yields about 32 biscuits.

Ingredients:
2 1/2 Cups (10 5/8 ounces) King Arthur Unb
leached All-Purpose Flour
2 Tsp Coarsely ground black pepper
4 to 6 Tbs (1 3/4 to 2 1/2 ounces) Sugar, to taste
1 Tsp Sea salt
2 Tsp Baking powder
1/2 Cup + 2 Tbs (5 ounces) Good dry red wine, such as Cabernet Sauvignon (non-alcoholic is fine)
1/4 Cup (1 3/4 ounces) Vegetable oil

Method:
1. In a medium-sized mixing bowl, combine the flour, pepper, sugar, salt and baking powder.
2. In a separate bowl, whisk together the wine and vegetable oil.
3. Add the liquid ingredients to the dry ingredients and mix well till the mixture is smooth, about 1 minute (see remarks).

4. Place the dough in plastic wrap and refrigerate it for at least 1 hour, or overnight.
5. Break off a piece of dough about the size of a walnut (about 3/4 oun
ce), and roll it into a ball. Poke a hole in the middle of the ball to make a small "bagel-shaped" biscuit.
6. Place it on a lightly greased or parchment-lined baking sheet. Repeat with
the remaining dough.
7. Bake the biscuits in a preheated 180° C (350° F) oven for 35 to 40 minutes, o
r until they're golden brown (they'll actually look kind of purple; that's OK).
8. Remove them from the oven, and cool completely on a wire rack.

Remarks:
The greater amount of sugar will make a biscuit which is just about as sweet as a cookie; the lesser amount will yield a more "savory-type" biscuit.
I added a little more wine to the mixture which turned out to be a bit too dry.
You can also just roll the pastry (
1.3cm/0.5 inch) and cut out rounds or squares.
Store those biscuits (at room temperature) in airtight containers for 3-4 days.

Serving suggestions:
Serve with cheese (perfect with Cheddar, Fontina or Pecorino), jalapeño jelly and with wine, grape juice spritzer, lemon-scented club soda or sangria.

~~~~~~~~~~~~~~~~~~~~~~

~ Biscuits Italiens Au Vin Rouge ~
Recette par The King Arthur Flour.


Pour 32 biscuits.

Ingrédients:
320g Farine blanche

2 CC Poivre noir, moulu grossièrement
4 à 6 Tbs (60 à 90g) de Sucre, selon goût
1 CC de Sel de mer
2 CC de Poudre à lever
150g/ml Vin rouge sec de qualité (Cabernet Sauvignon/sans alcool convient aussi)
53g d'Huile végétale


Méthode:
1. Dans un bol moyen, mélanger ensemble la farine, le poivre, le sucre, le sel et la p
oudre à lever.
2. Dans un autre bol, battre ensemble le vin avec l'huile.
3. Ajouter le mélange liquide au mélange sec et mélanger vigoureusement pendant 1 minute afin d'obtenir une pâte souple (voir remarques).
4. Emballer la pâte dans un film plastique et mettre au frigo pendant 1 heu
re ou toute une nuit.
5. Abaisser la pâte (1.3cm épaisseur) et découper des ronds (7cm) avec un emporte-pièce. Vous pouvez aussi découper des biscuits en forme de "bagel".
6. Mettre les biscuits sur la plaque de cuisson recouverte de papier sulfurisé.
7. Cuire les biscuits à 180° C (350° F) dans un four préchauffé pendant 35 to 40 minutes, ou jusqu'à ce que les biscuits soient joliment "dorés".
8. Retirer du four et faire refroidir sur une grille.


Remarques:
Si vous utilisez 90g de sucre, alors vos biscuits seront aussi sucrés que des cookies. Si vous ajoutez très peu de sucre vos biscuits seront plus salés (tels des crackers). a vous de choisir la quantité de sucre désirée.
J'ai dû rajouter un peu de vin car la pâte était un peu sèche.
Ces biscuits se conservent très bien 3 à 4 jours dans une boîte hermétiquement fermée.

Idées de présentation:
Ces biscuits sont délicieux avec du fromage (parfaits avec du Cheddar, de la Fontina ou du Pecorino) et de la gelée de piment jalapeño ou servis à l'apéritif avec du vin, de la sangria ou des cocktails.

Wednesday, May 12, 2010

HOPING FOR WARMER DAYS

Unfortunately, since my last Wednesday post, the weather has not changed. It is still very grey, quite fresh and it has not stopped raining. Although it is good for nature, it messes with our minds...

Anyway, I hope you'll enjoy the following pictures that I took when the weather was not as capricious as now!


Sunday, May 9, 2010

WEEKEND CAT BLOGGING #257

This week, Jules and Vincent at "Mind Over Matter" (USA) are happy to announce that they are hosting Weekend Cat Blogging #257...

To submit your kitty picture(s), you can either leave a message in their blog's comment section (with your permalinks) or contact them via e-mail without forgetting to give all the needed information.


~ Better Than Ever ~

Friday, May 7, 2010

DATE BARS - BARRES AUX DATTES


I have a very special relationship with food. You see, I tend to act like a squirrel and keep perishable products for far too long. Because of that bad mania, I generally end up creating menus or making treats in order to rescue from the dustbin the food that I have amassed greedily and stocked as if I were preparing for war...

So, as I had a leftover packet of Christmas dates that was about to expire, I thought that it would be great to not let it rot any further and to use it for making a sweet something that'll uplift our spirits which have been shattered by the awful weather outside. Some of the best treats to bring back a smile on your face are certainly cookie bars, so that's what I decided to bake.

After a little research, I found the perfect bar in Tish Boyle's "The Good Cookie". If you can't find anything interesting to bake in this "bible",
then you must be a cookie hater! There is not one recipe in this book that you would want to make and most importantly, all of the recipes I tested until now have been very successful.

The "Date Bars" are wonderful on all levels. They have a delightful spicy, nutty, buttery and fruitty flavor and a very pleasant flaky, crunchy as well as chewy (not too much, though) texture. Those bars are excellent and extremely addictive. Perfect for picnics, brunches or tea time!

~ Date Bars ~
Recipe taken from Tish Boyle's "The Good Cookie" and slightly adapted by Rosa @ Rosa's Yummy Yums 2010.

Makes 16 bars.

Ingredients for the "Sweet Pastry Crust":
1 1/3 Cups All-purpose flour
1/3 Cup Granulated sugar
1/2 Tsp Sea salt
1/2 Cup (1 stick) Cold unsalted butter, cut into
1/2-inch cubes

1 Large egg yolk
2 Tsp Cold water
1 Tsp Vanilla extract
Ingredients for the "Date Filling":
2 Cups pitted dates, cut in half
1/3 Cup Granulated sugar
1 1/2 Cups Water
1 Tsp Finely grated organic orange zest

1/4 Tsp Sea salt
1 Cinnamon stick

Ingredients for the "Topping":
2/3 Cup All-pupose flour
1/4 Cup Firmly packed dark brown sugar
1 Tsp Ground cinnamon
1/8 Tsp Sea salt
1/2 Cup Walnuts, coarsely chopped
60g Unsalted butter, melted Confectioner's sugar for dusting (optional)


Method for the "Sweet Pastry Crust":
1. Position a rack in the centre of the oven and preheat the oven to 180° C (350° F).
2. Grease the bottom and sides of a 22cm (9-inch) square baking pan
.
3. Place the flour, sugar and salt in the bowl of a food processor and process until blended.
4. Scatter the butter pieces over the flour mixture a
nd process until the mixture resembles coarse meal, about 6 seconds.
5. In a small bowl or cup, whisk together the egg yolk, water and vanilla extract.
6. With the food processor running, add the yolk mixture through the feed tube and process just until the dough begins to come together in large clumps, 15
to 20 seconds.
7. Scrape the dough into prepared pan and, using your fingers, pat it evenly into the bottom of the pan.

8. Bake the crust until golden, 20 to 25 minutes.
9. Transfer the pan to a wire rack to cool while you prepare the date filling a
nd topping.
Method for the "Date Filling":
1. In a medium saucepan, combine dates, sugar, water, orange zest, salt and cinnamon.
2. Bring to a boil and reduce the heat. Simmer for about 15 to 20 minutes until the dates are tender.
3. Let the mixture cool for about 10 minutes, then remove the cinnamon stick and transfer to the bowl of a food processor.
4. Process the mixture until smooth.
5. scrape the filling onto the cooled crust and spread evenly, covering the crust completely.
Method For the "Topping":
1. In a medium bowl, mix together the flour, sugars, cinnamon and salt until blended.
2. Stir in the nuts and then the melted butter, until the mixture comes together.
3. Sprinkle the topping evenly over the date filling, covering it.
Method for the "Baking":
1. Bake at 180° C (350° F) for about 25 to 30 minutes, until the top is lightly browned. 2. Cool completely on a wire rack.
3. Cut into 16 bars and sprinkle with the confectioner's sugar.

Remarks:

You can replace the dark brown sugar by light brown sugar and the walnuts by pecans.
Store those bars in an airtight container (I keep them in the fridge) at room temperature for up to 5 days.

Serving suggestions:
Eat those squares with some ice cream (vanilla, pecan, walnut, caramel, etc...) or alone.

~~~~~~~~~~~~~~~~~~~~~~


~Barres Aux Dattes ~
Recette tirée du livre "The Good Cookie" par Tish Boyle et adaptée par Rosa @ Rosa's Yummy Yums 2010.

Donne 16 barres.

Ingrédients pour la "Pâte Sucrée":
170g de Farine fleur/blanche
70g de Sucre cristallisé
1/2 CC de Sel
120g de Beurre non-salé froid et coupé en petits cubes
1 Gros jaune d'oeuf
2 CC d'Eau glacée
1 CC d'Extrait de vanille
Ingrédients pour la "Garniture Aux Dattes":
~315g de Dattes dénoyautées et coupées en deux
70g de Sucre crystallisé
360ml/g d'Eau
1 CC de Zeste d'orange bio
1/4 CC de Sel de mer

1 Bâtonnet de cannelle
Ingrédients pour le "Streusel":
85g de Farine blanche
60g de Sucre brun foncé
1 CC de Cannelle en poudre
1/8 de CC de Sel de mer
60g de Noix de Grenoble, hachées grosssièrement
60g de Beurre non-salé, fondu Sucre en poudre pour saupoudrer (en option)

Méthode
pour la "Pâte Sucrée":
1. Positionner une grille de cuisson au milieu du four et préchauffer à 180° C (350° F).
2. Beurrer/graisser le fond et les bord
s d'un moule carré de 22cm (9-inch).
3. Mettre la farine, le sucre et le sel dans le bol du mixer et mixer jusqu'à ce que ça soit bien homogène.

4. Disperser les cubes de beurre sur le mélange farine/sucre/sel et mixer 6 secondes afin d'obtenir un mélange grossier ressemblant à un appareil à crumble.
5. Dans un petit bol ou une tasse, battre ensemble le jaune d'oeuf, l'eau et l'extrait de vanille.
6. Ajouter ce mélange au "crumble" dans le mixer et pulser pendant 15-20 secondes jusqu'à obtention d'une pâte.

7. Racler cette pâte et la mettre dans le moule, puis, en utilisant vos doigts, bien la presser de manière afin de couvrir le fond du moule de manière égale.
8. Cuire pendant 20 à 25 minutes, jusqu'à ce que la pâte soit dorée.
9. Sortir le moule du four et le mettre sur une grille afin que la pâte refroidisse pendant que vous préparez l'appareil aux dattes et le streusel.

Méthode pour la "Garniture Aux Dattes":
1. Dans une casserole moyenne, mélanger ensemble les dattes, le sucre, l'eau, le zeste, le sel et le bâtonnet de cannelle.
2. Porter à ébullition et réduire la température. Faire mijoter pendant 15 à 20 minutes, jusqu'à ce que les dattes soient tendres.
3. Faire refroidir le mélange pendant 10 minutes puis enlever le bâtonnet de cannelle et mettre le mélange dans un blender.
4. Mixer jusqu'à obtention d'une purrée fine.
5. Verser le mélange sur la croûte et répartir de manière homogène en recouvrant entièrement la croûte.
Méthode pour le "Streusel":
1. Dans un bol moyen, mélanger la farine, les sucres, la cannelle et le sel.
2. Ajouter les noix concassées et le beurre fondu. Bien mélanger afin que la préparation soit légèrement colmatée.
3. Répartir le streusel sur la purrée de dattes afin de la recouvrir entièrement.
Méthode pour la "Cuisson":
1. Cuire à 180° C (350° F) pendant 25 à 30 minutes jusqu'à ce que le dessus soit légèrement doré.
2. Laisser refoidir sur une grille.
3. Couper en 16 parts égales et saupoudrer avec le sucre en poudre.


Remarques:
Vous pouvez remplacer le sucre brun foncé par du sucre brun clair et les noix de Grenoble par des noix de pécan.
Ces barres se conservent 5 jours (à température ambiante - je les mets au frigo) dans une boîte.

Idées de présentation:
Vous pouvez servir ces carrés avec une boule de glace (vanille, café, noix de pécan, noix de Grenoble, caramel, etc...) ou servis tel quel.

Wednesday, May 5, 2010

NATURE HAS AWAKEN

Spring never ceases to amaze me. It is an wonderful time of the year that I really love for evrything looks so fresh and cheerful...


I am always shocked to see how nature blooms incredibly rapidly. One day, plants timidly grow, show their buds and the next (well not exactly - within a few days) they release their flowers and leaves in an incredible symphony of flashy colors and exhalirating fragrances! Two weeks ago, the predominant color was still brown with hints of green and now everything's bright green.


Although, one might think it's already summer just by looking outside, the capricious weather is here to prove the contrary. Last week, the temperatures were incredibly hot (27° C/81° F) for April and the sun was shining strong. We were able to sit on the balcony and go out in short sleeves. Now, the temperatures are very low for May (11° C/52° F) and it is grey and raining cats and dogs. It has even snowed in some places (up to 30cm). Incredible changes!


Anyway, things should get back to normal very soon and we should be able to enjoy the pleasant warmth of May, but in the meantime, I would like to share a few shots of Veyrier that I took last week.

I hope you'll enjoy them
as there's yet more to come...


Sunday, May 2, 2010

WEEKEND CAT BLOGGING #256

This week, Mog at "Mind Of Mog" (USA) is happy to announce that he is hosting Weekend Cat Blogging #256...

To submit your kitty picture(s), you can either leave a message in his blog's comment section (with your permalinks) or contact him via e-mail without forgetting to give all the needed information.